How to Create Walls in Revit: Step-by-Step Tutorial for Beginners (Updated October 2026) (Updated October 2026)
Revit wall creation is the foundation of every architectural BIM project — and it is much simpler than most beginners expect. BIM adoption is accelerating fast: India''s government now mandates BIM for all public infrastructure projects above ₹100 crore (effective 2025), and Pune Metro Line 3 became fully BIM-modelled in May 2026. Knowing how to create, modify, and dimension walls in Revit is the single most important skill for any civil engineering or architecture student entering the BIM-first job market. This tutorial walks you through exactly what ABC Trainings teaches in its Revit beginner module — the same method our trainer demonstrates in the video above.
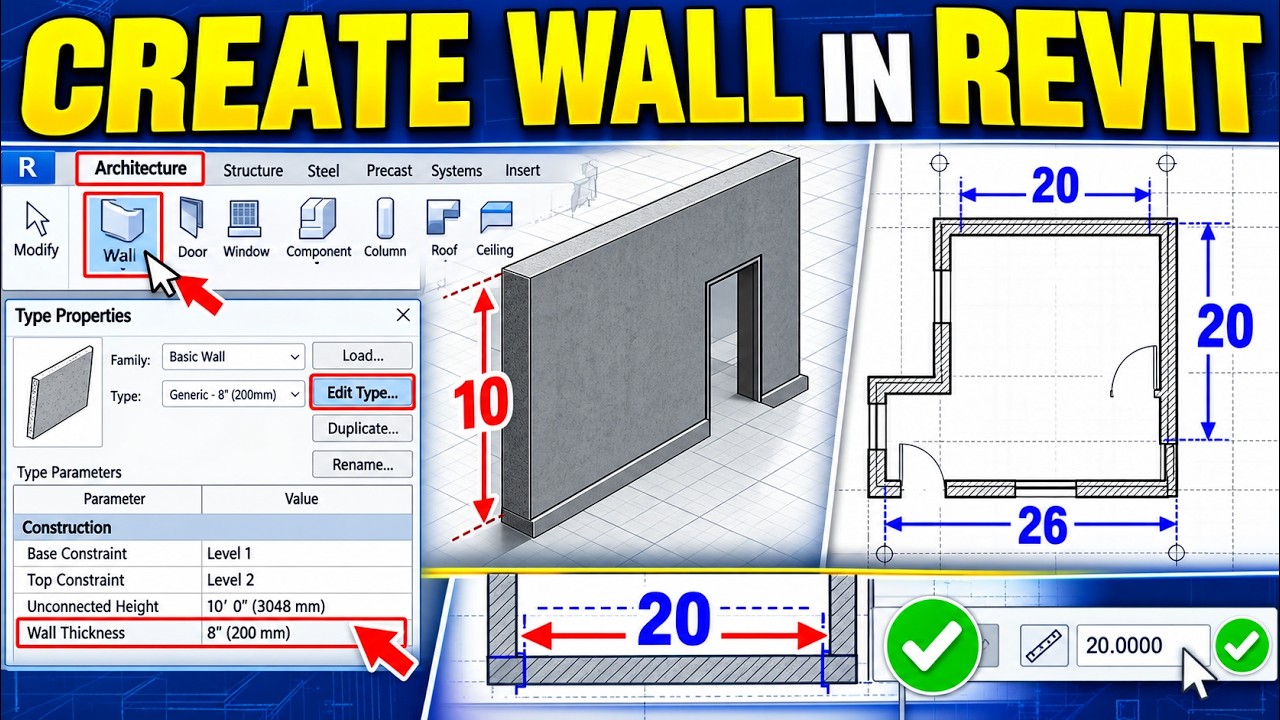
- To create a wall in Revit: Architecture tab → Wall → select type → Edit Types → Duplicate → rename → edit thickness → set height → draw
- Always check dimensions after drawing each wall segment
- Common wall heights: 3000mm (exterior), 2700mm (interior partitions)
- Use Trim/Extend (TR shortcut) to join wall ends cleanly in any floor plan
Getting Started: The Architecture Tab and Wall Command in Revit
To start creating walls in Revit, open the Architecture tab in the top ribbon — this is where all architectural elements live, including walls, doors, windows, and floors. The Architecture tab is the first place you should get comfortable with as a Revit beginner. Click the Wall command near the left side of the Build panel; Revit enters wall-drawing mode immediately.
When you activate the Wall command, the Options Bar at the top changes to show wall-specific settings: wall height, base constraint, top constraint, and location line. The Properties panel on the left shows the currently active wall type. Before drawing a single line, take 5 seconds to confirm these settings — the correct wall type, height, and base level. Most beginner errors happen because students click Wall and immediately start drawing without checking parameters first. Trust me, setting them first saves you from undoing everything three minutes later.

Understanding Revit Wall Types: Basic, Exterior, Interior and Compound
Revit comes with several built-in wall types — Basic Wall, Curtain Wall, and Stacked Wall are the three main categories. For most beginner architectural projects, you will work with Basic Walls. Within Basic Walls, Revit includes presets like Exterior – Brick on CMU, Generic – 8 inch (200mm), Generic – 6 inch (150mm), and Interior – Partition (2-hr). The 8-inch and 6-inch types (or their metric equivalents — 200mm, 250mm) are the most commonly used in beginner tutorials.
What most beginners don''t realize: Revit wall types are wall assemblies — they define not just thickness but also the material layers (structure, thermal finish). When you create a custom wall type, you are defining how that wall is physically built. This is what makes BIM different from 2D CAD: the wall knows what it is made of, not just how wide it is. Understanding wall types early makes schedules, material takeoffs, and cost estimation much easier later.
| Wall Type in Revit | Typical Use | Standard Thickness | How to Edit |
|---|---|---|---|
| Basic Wall – Generic | Beginner exercises, concept models | 200mm / 250mm | Edit Type → Structure → Edit |
| Exterior – Brick on Concrete | Exterior walls with layered finish | 300–400mm total | Edit Assembly dialog |
| Interior Partition | Internal room dividers | 115–150mm | Edit Type → Structure |
| Custom Wall Type | Project-specific; named per convention | As designed | Duplicate → rename → Edit Assembly |
How to Duplicate and Rename a Wall Type in Revit
To duplicate and rename a wall type in Revit: with the Wall command active, click the wall type dropdown in the Properties panel. Click Edit Type. In the Type Properties dialog, click Duplicate. Type a descriptive name — for example "ABC_ExteriorWall_250mm" or the thickness value you need — then click OK. You have now created a custom wall type in this project.
Here is the thing about naming: use a clear naming convention from day one. If you name walls "Wall 1", "Wall 2", "Wall 3", you will be completely lost in a complex project. Best practice — prefix with a project code or use descriptive labels like "Ext_Brick_230mm", "Int_Partition_115mm". This is exactly how firms like L&T and AECOM manage large BIM models, and it is what ABC Trainings teaches from the very first class.
Setting Wall Thickness and Height Before Drawing
Setting wall thickness and height in Revit is done through Type Properties and the Options Bar respectively. For thickness: after duplicating your wall type, click Edit in the Type Properties → Structure section. The Edit Assembly dialog shows each layer of the wall — change the Thickness column value for the structural layer to your required measurement (for example, enter 250 for a 250mm wall). Click OK twice to confirm.
For wall height: in the Options Bar at the top, set the Unconnected Height value — type 3000 for a 3-metre exterior wall or 2700 for a standard interior room height. In the ABC Trainings classroom exercise demonstrated in the video above, the trainer sets a height of 10 (feet) and creates walls at dimensions including 20 and 26 (feet) in sequence. The good news: you can always change height later by selecting a wall and editing its properties — nothing is permanent in Revit.
Drawing Walls and Checking Dimensions Step by Step
To draw a wall in Revit: with the Wall command active and your wall type and height confirmed, click the first point on the floor plan canvas, then click the second point to define the wall length. A temporary dimension appears showing the length as you move the cursor — you can type a value directly (like 3000 or 5000) and press Enter to set the exact length. In the ABC Trainings classroom exercise shown in the video, the trainer enters dimensions step by step — 20 (first segment), then 26 — and immediately checks the dimension annotation after each wall to confirm accuracy.
After drawing, press Escape or click Modify to exit wall-drawing mode. Select the wall and look at the temporary dimensions — these confirm exactly what you drew. The trainer''s instruction "dimension check: step by step" means verify the dimension reads correctly after every element. If it doesn''t match, select the wall, click the blue dimension grip, and type the corrected value. This 10-second check is the single habit that separates accurate BIM models from ones that need hours of correction later.
Common Mistakes Beginners Make When Creating Walls in Revit
Common beginner mistakes when creating walls in Revit: (1) Not setting base and top constraint correctly — walls with "Unconnected" top don''t attach to the floor above; use "Up to Level: Level 2" in multi-storey projects. (2) Drawing in 3D view instead of floor plan view — always draw walls in plan; snaps and dimensions work correctly there. (3) Not closing wall chains — use Trim/Extend (TR shortcut) to join wall ends cleanly. (4) Using the wrong location line — "Wall Centerline" is fine for basic exercises; "Core Centerline" and "Finish Face: Exterior" matter for construction documents. (5) Not naming custom wall types descriptively.
The good news: every one of these mistakes is fixable in Revit. Unlike hand drafting, you can edit, undo, and regenerate instantly. Practice drawing and editing a 4-room floor plan — that single exercise builds all the wall creation and editing skills needed for BIM entry-level work at L&T, AECOM, Pune Metro project consultants, or any firm using Revit.
CMYKPY (Chatrapati Maha Yojana Kaushal Paryavaran Yojana) provides government training stipend of ₹6,000–10,000 to eligible Maharashtra residents joining BIM and construction technology courses. ABC Trainings is an approved partner. Ask at enrollment to apply your CMYKPY benefit toward your Revit/BIM course fee.Get the BIM Brochure + Fees + Batch Dates on WhatsApp
Free 1:1 counselling. Placement track record. CMYKPY/PMKVY eligibility check.
💬 Get Brochure on WhatsApp📞 Call 7039169629About the author: Komal Chilwar, Civil & BIM Trainer, ABC Trainings.
Visit Our Centers
- Wagholi (Pune): 1st Floor, Laxmi Datta Arcade, Pune-Ahilyanagar Highway. Call 7039169629
- Hadapsar (Pune HQ): 1st Floor, Shree Tower, opp. Vaibhav Theater, Magarpatta. Call 7039169629
- Cidco (Chh. Sambhajinagar): Kalpana Plaza, opp. Eiffel Tower, N-1 Cidco. Call 7039169629
- Osmanpura (Chh. Sambhajinagar): S.S.C Board to Peer Bazar Road, near Jama Masjid. Call 7039169629
- Sangli: Shubham Emphoria, 1st Floor, Above US Polo Assn., Sangli-Miraj Rd, Vishrambag. Weekend batches available. Call 7039169629
FAQs
How do I create a wall in Revit for beginners?
To create a wall in Revit: click the Architecture tab → Wall command → select your wall type from the Properties panel → set height in the Options Bar → click two points on the floor plan to draw the wall. Always check the temporary dimension after drawing to confirm the correct length. The full step-by-step process is covered in this article and in the ABC Trainings video above.
How do I change wall thickness in Revit?
To change wall thickness in Revit: with the Wall command active, click Edit Type in the Properties panel → click Duplicate to create a custom type → click Edit in the Structure row → change the thickness value for the structural layer in the Edit Assembly dialog → click OK twice. The new thickness applies to all instances of that wall type in the project.
What is the Architecture tab used for in Revit?
The Architecture tab in Revit is used to create and manage all architectural building elements: walls, doors, windows, floors, roofs, ceilings, stairs, and railings. It is the primary working tab for architecture and civil engineering students learning BIM. All element placement and modification tools for the building shell are found here.
Which Revit BIM training institute in Maharashtra is best for civil engineering students?
ABC Trainings is the best Revit and BIM training institute for civil engineering students in Maharashtra — with centres in Wagholi and Hadapsar (Pune), Chhatrapati Sambhajinagar, Nashik, and across 11 cities. Trainers have ex-L&T and AECOM experience. The curriculum covers Revit Architecture, Revit Structure, Navisworks, and BIM coordination. CMYKPY eligible. Call 7039169629.