
How to View a Floor Plan in 3D in Revit: Step-by-Step Tutorial (2026) (Updated October 2026)
Viewing a floor plan in 3D in Revit is one of the first — and most practically useful — skills a BIM student masters. In just two clicks (View tab → 3D Views → Default 3D), you switch from the flat plan view to a full orthographic 3D model. Add Tile View and you see both side by side, exactly how BIM coordinators work on live projects like Pune Metro Line 3 (23.3 km, inaugurated May 2026) and Maharashtra's growing list of projects requiring BIM under the ₹100 crore mandate. This tutorial covers every step shown in ABC's video — opening the 3D view, using Tile View, navigating with mouse and ViewCube, and fixing the three most common problems students hit in early Revit sessions.
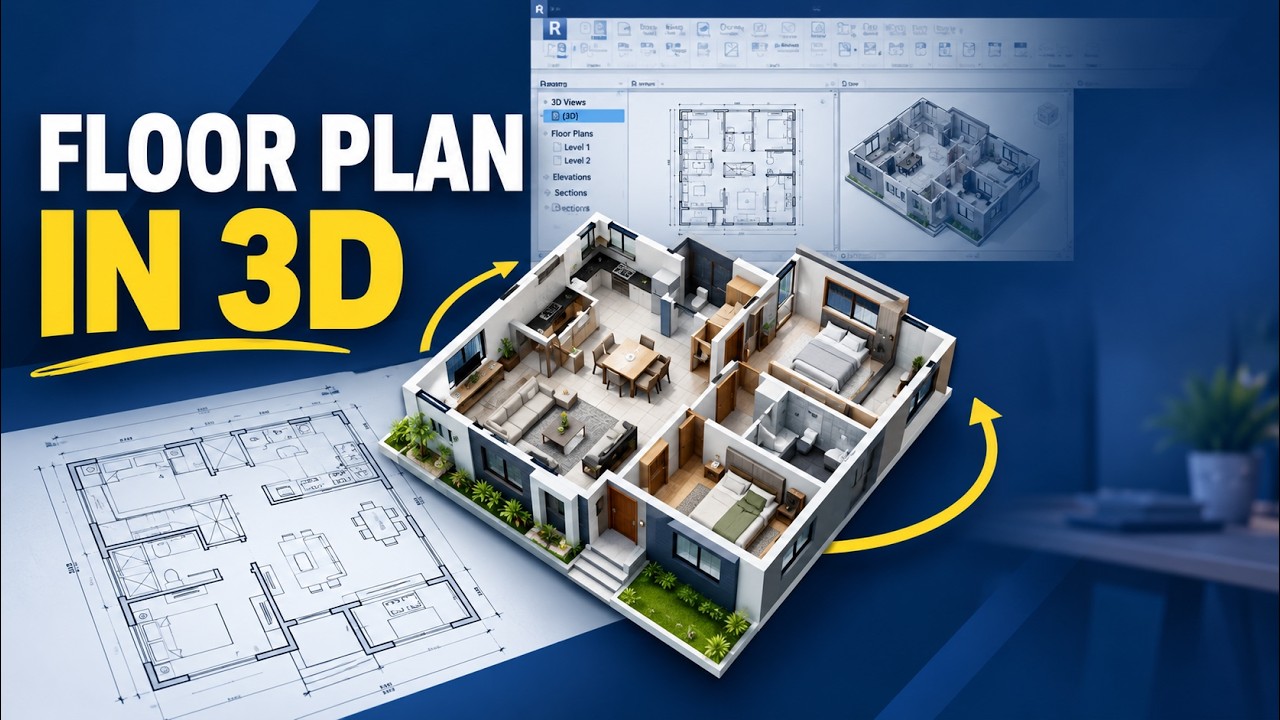
- Go to View tab → 3D Views → Default 3D to switch your floor plan to 3D in Revit (2 clicks)
- Use Tile View (View tab → Windows → Tile Views) to see floor plan and 3D side by side simultaneously
- Navigate with middle mouse button: scroll to zoom, drag to pan, Shift + drag to orbit
- Always use Default 3D View (orthographic) for coordination — never Perspective view
- Section Box in 3D view Properties crops to a specific floor level for level-by-level review
Why Viewing a Floor Plan in 3D in Revit Matters for BIM Work
Viewing a floor plan in 3D in Revit lets you instantly spot coordination errors invisible in plan view — a wall not connecting at full height, a structural column missing from the architectural model, or a roof plane that does not match the floor plate. For BIM coordinators working on large Maharashtra infrastructure projects (Pune Metro Line 3, 23.3 km, May 2026; state BIM mandate for projects above ₹100 crore), switching between floor plan and 3D view is a daily workflow requirement. The good news: Revit makes it fast — two clicks to open the 3D view, one more to set up split-screen Tile View. The Default 3D View in Revit is a live, parametric view — not a snapshot or render. Every element you see is the actual model, editable in place, which is what makes it so powerful for live coordination work.
How to Open the Default 3D View in Revit: Step by Step
To open the Default 3D View in Revit from a floor plan: (1) With your floor plan open in the project, go to the View tab in the ribbon at the top. (2) In the Create panel, click the 3D View dropdown arrow. (3) Select Default 3D View. Revit opens the standard isometric 3D view — the default orientation is from the front-right-top corner of the building, which is the same angle you saw in the ABC Trainings video. This view is synced to your model: any change you make in the floor plan immediately reflects when you return to the 3D view. What most people do not realise: you can select walls, doors, and structural elements directly in the Default 3D View and modify their properties without switching back to the floor plan. This makes it faster for quick height and level corrections during model coordination sessions.
| Task | Revit Shortcut / Path | When to Use |
|---|---|---|
| Open Default 3D View | View tab → 3D Views → Default 3D | Quick model overview |
| Tile floor plan + 3D | View tab → Windows → Tile Views | Coordination review |
| Orbit (rotate) model | Shift + middle mouse button drag | Free 3D navigation |
| Snap to standard view | Click ViewCube face (Top/Front/Right) | Quick orientation reset |
| Visibility/Graphics | VG (keyboard shortcut) | Hide heavy categories for speed |
| Crop to floor level | 3D view Properties → Section Box ✓ | Level-by-level review |
How to Use Tile View in Revit: Floor Plan and 3D Side by Side
Tile View in Revit shows your floor plan and 3D model simultaneously in split-screen — exactly how professional BIM coordinators review models on live projects. To enable it: (1) Open both the floor plan view and the Default 3D View as separate Revit views (each opens as a tab). (2) Go to View tab → Windows panel → Tile Views. Revit arranges the open views side by side. (3) Click in the floor plan window, then click in the 3D window — both are active at the same time. When you click an element in the floor plan, Revit highlights the same element in the 3D view automatically — this cross-view selection is especially useful for verifying that walls, columns, and MEP runs are in the correct 3D position before issuing coordinated drawings. At ABC Trainings' BIM with Revit program, students practice the full Tile View workflow from the first week of the Revit Architecture module.
How to Navigate (Orbit, Zoom, Pan) the 3D Model in Revit
Rotating and navigating the 3D model in Revit uses the middle mouse button as the primary control: scroll to zoom in and out; hold the middle mouse button and drag to pan; hold Shift and the middle mouse button and drag to orbit (rotate freely in 3D). The ViewCube in the top-right corner of the 3D view is the fastest way to snap to standard orientations — click Top to see the model from above (same as floor plan), click Front or Right for elevation views, or drag the cube itself to freeform orbit. For more precise navigation during BIM review sessions, press F8 or go to View tab → Navigate panel → SteeringWheels — this gives Walk mode, Look mode, and saved orbit positions for navigating large models efficiently. Trust me, once you are comfortable with middle-mouse orbit and the ViewCube, navigating a full Revit BIM model of a 200-room residential tower becomes second nature within a few sessions.
Common Mistakes When Viewing Floor Plans in 3D in Revit — and How to Fix Them
Three common mistakes to avoid when viewing floor plans in 3D in Revit: First — using Perspective 3D instead of Default 3D for coordination. Perspective view distorts geometry and makes measurements unreliable; always use the Default 3D View (orthographic) for model coordination and clash checking. Second — the Crop View getting accidentally locked, which cuts off parts of the model and makes elements appear missing. Fix this by opening 3D view Properties and unchecking Crop View, or right-clicking in the 3D view and selecting Reset 3D Extents. Third — slow 3D performance on large models. Use Visibility/Graphics (keyboard shortcut VG) to turn off heavy categories like topography, structural rebar, or MEP insulation that you do not need for the current review — this can make navigation 3–5× faster on complex models. These are the same issues the ABC Trainings video addresses for students working through Revit's 3D view tools for the first time.
Get the AI Powered Building Information Modeling (BIM) Brochure + Fees + Batch Dates on WhatsApp
Free 1:1 counselling. Placement track record. CMYKPY/PMKVY eligibility check.
💬 Get Brochure on WhatsApp📞 Call 7039169629About the author: Komal Chilwar, Civil & BIM Trainer, ABC Trainings.
Visit Our Centers
- Wagholi (Pune): 1st Floor, Laxmi Datta Arcade, Pune-Ahilyanagar Highway. Call 7039169629
- Hadapsar (Pune HQ): 1st Floor, Shree Tower, opp. Vaibhav Theater, Magarpatta. Call 7039169629
- Cidco (Chh. Sambhajinagar): Kalpana Plaza, opp. Eiffel Tower, N-1 Cidco. Call 7039169629
- Osmanpura (Chh. Sambhajinagar): S.S.C Board to Peer Bazar Road, near Jama Masjid. Call 7039169629
- Sangli: Shubham Emphoria, 1st Floor, Above US Polo Assn., Sangli-Miraj Rd, Vishrambag. Weekend batches available. Call 7039169629
FAQs
How do I open a 3D view from a floor plan in Revit?
To view a floor plan in 3D in Revit, go to the View tab in the ribbon, click the 3D View dropdown in the Create panel, and select Default 3D View. Revit opens an orthographic 3D view of the full building model. To see the floor plan in 3D at a specific level, enable a Section Box in the 3D view Properties panel and drag the box handles to crop to your floor. To see the floor plan and 3D simultaneously, go to View tab → Windows → Tile Views after opening both views.
What is Tile View in Revit and how does it help BIM coordination?
Tile View in Revit displays multiple open views simultaneously — for example, a floor plan on the left and the Default 3D View on the right. When you click an element in the floor plan, Revit highlights the same element in the 3D view automatically, making it easy to verify spatial relationships and catch coordination errors. To enable it, open both views as tabs, then go to View tab → Windows → Tile Views. BIM coordinators use Tile View constantly on live projects to check that walls, structural columns, and MEP runs are correctly positioned before issuing coordinated drawings.
Why is Revit 3D navigation slow on large models — and how do I fix it?
Slow 3D navigation in Revit on large models is almost always caused by too many visible categories being rendered simultaneously. Fix it by pressing VG (Visibility/Graphics Override), then turning off heavy categories you do not need for the current review — topography, structural rebar, MEP insulation, and furniture are the main culprits. This can make navigation 3–5× faster on complex models. Also ensure hardware acceleration is enabled in Revit Options → Graphics — modern workstations should have it on by default, but it can get disabled after software updates.
Which BIM institute in Pune teaches Revit 3D view navigation and coordination properly?
ABC Trainings (Wagholi and Hadapsar, Pune) covers Revit 3D navigation — Default 3D view, Tile View, Section Box, ViewCube, and Visibility/Graphics — as part of the BIM with Revit Architecture module from the first week. Students practice on real construction project data, not textbook exercises. The program covers Revit Architecture, Structure, MEP, and Navisworks with placement support and Autodesk-authorized certification. BIM with Revit graduates earn ₹3.5–6 LPA as freshers; BIM Coordinators with 3 years earn ₹10–16 LPA in Pune. Call 7039169629 or WhatsApp 7774002496 for the current batch schedule.